OpenCVカメラ座標とUnity World座標の構造的矛盾を発見した|デジタルツイン検証
VLM評価の統合、カメラ追従ピックの実装、そして設計の根本的な問題に気づいた日。
💡 Key Takeaway
VLM(Claude API)による画像判定をr2r2r_loop.pyに統合し、ピックアンドプレースの結果をAIが評価するパイプラインが完成した。カメラ座標からロボット座標への変換も実装し、アームがブロックの方向に追従して動くところまで到達した。しかし終盤に気づいた。send_coords()で追従した後にsend_angles()の固定座標でPICKする設計は、追従した意味がなくなる。明日、設計を統一する。
やったこと | 起きたこと | 判断 |
|---|---|---|
vlm_judge.pyを実装した | 「箱の中にブロックがあるか」をClaude APIが正確に判定した | success/failure/reasonのJSON出力で後続のCSVログに繋がる |
r2r2r_loop.pyにVLMを統合した | HSV判定をVLM判定に完全置き換えした | reasonフィールドにAIの判断理由が記録されるようになった |
フルパイプラインで実行した | mechArmが動いてVLMがsuccessを返した | r2r2r_loop.pyとVLMが繋がって動いた |
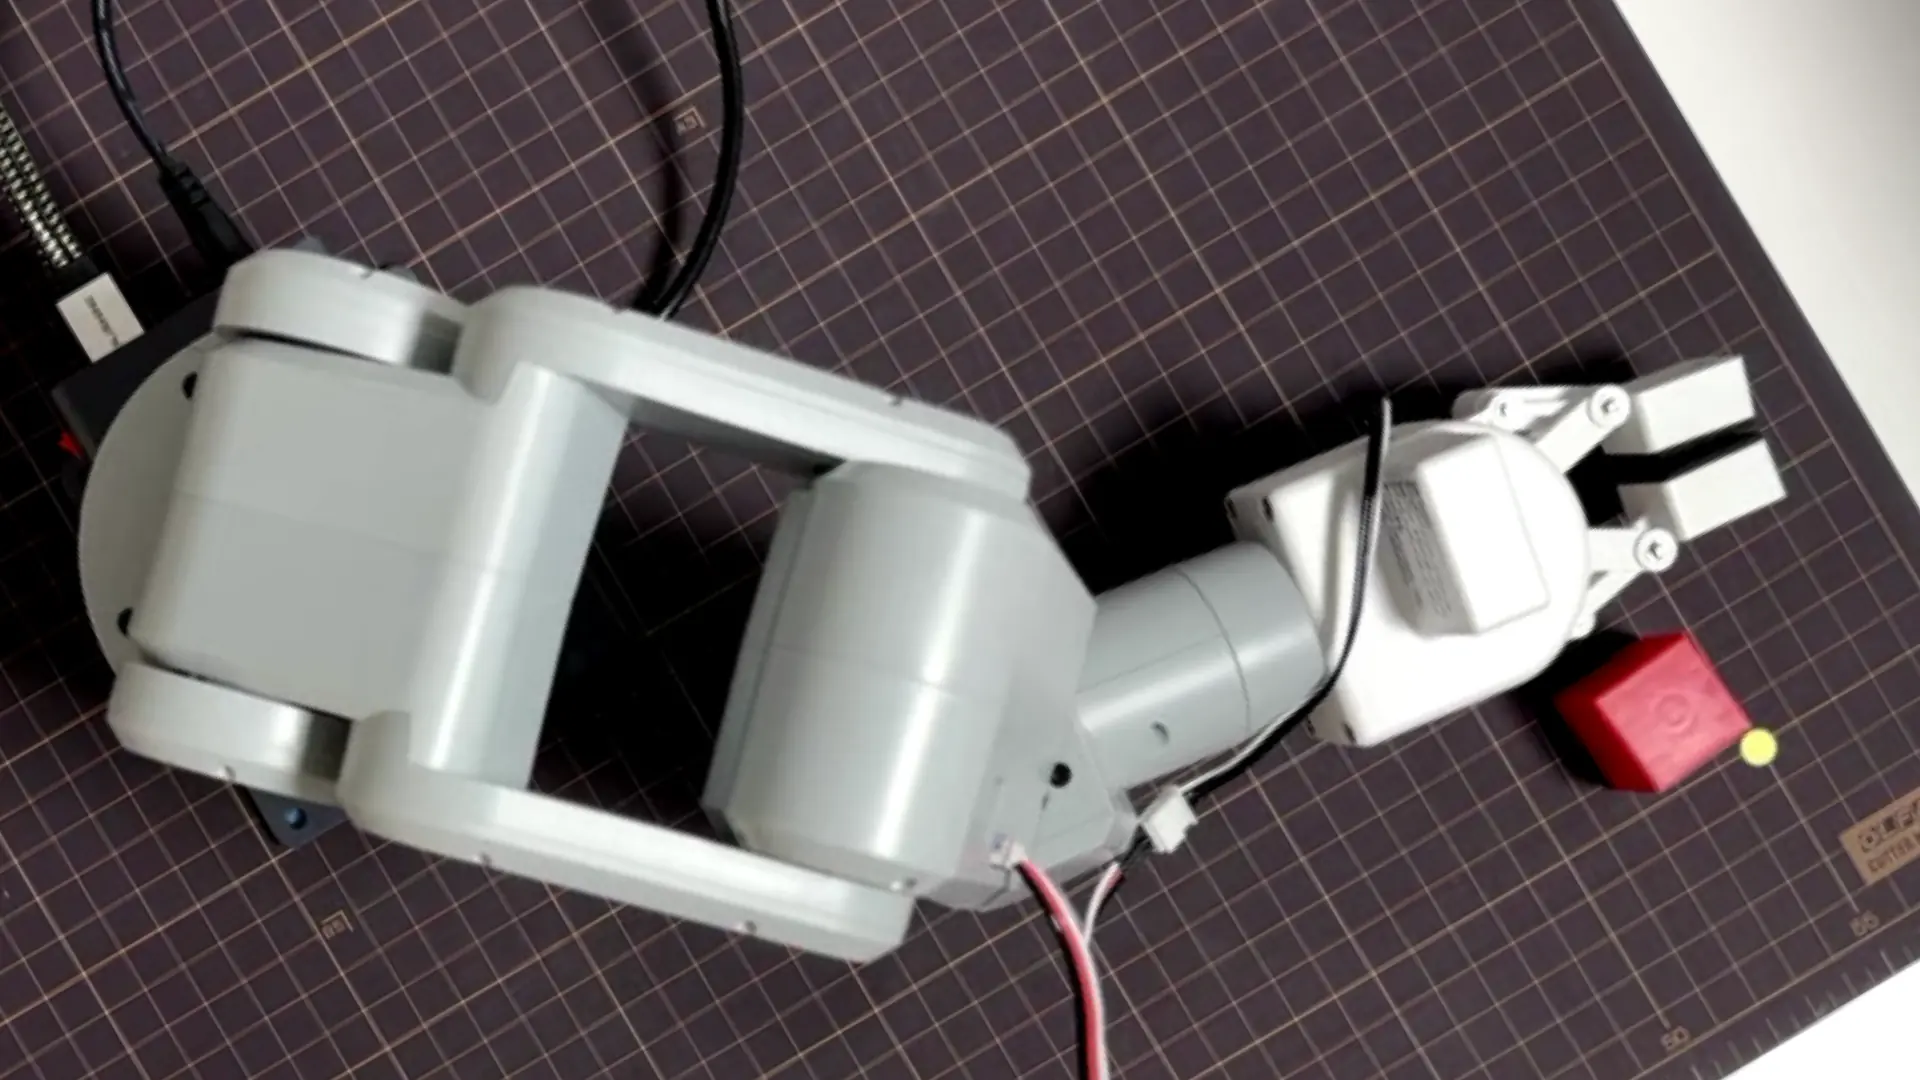
camera_pick_mac.py / camera_pick_pi.pyを実装した | カメラのWorld XYをロボット座標に変換してアームが追従した | PICKにsend_angles()を使う設計的矛盾を発見した |
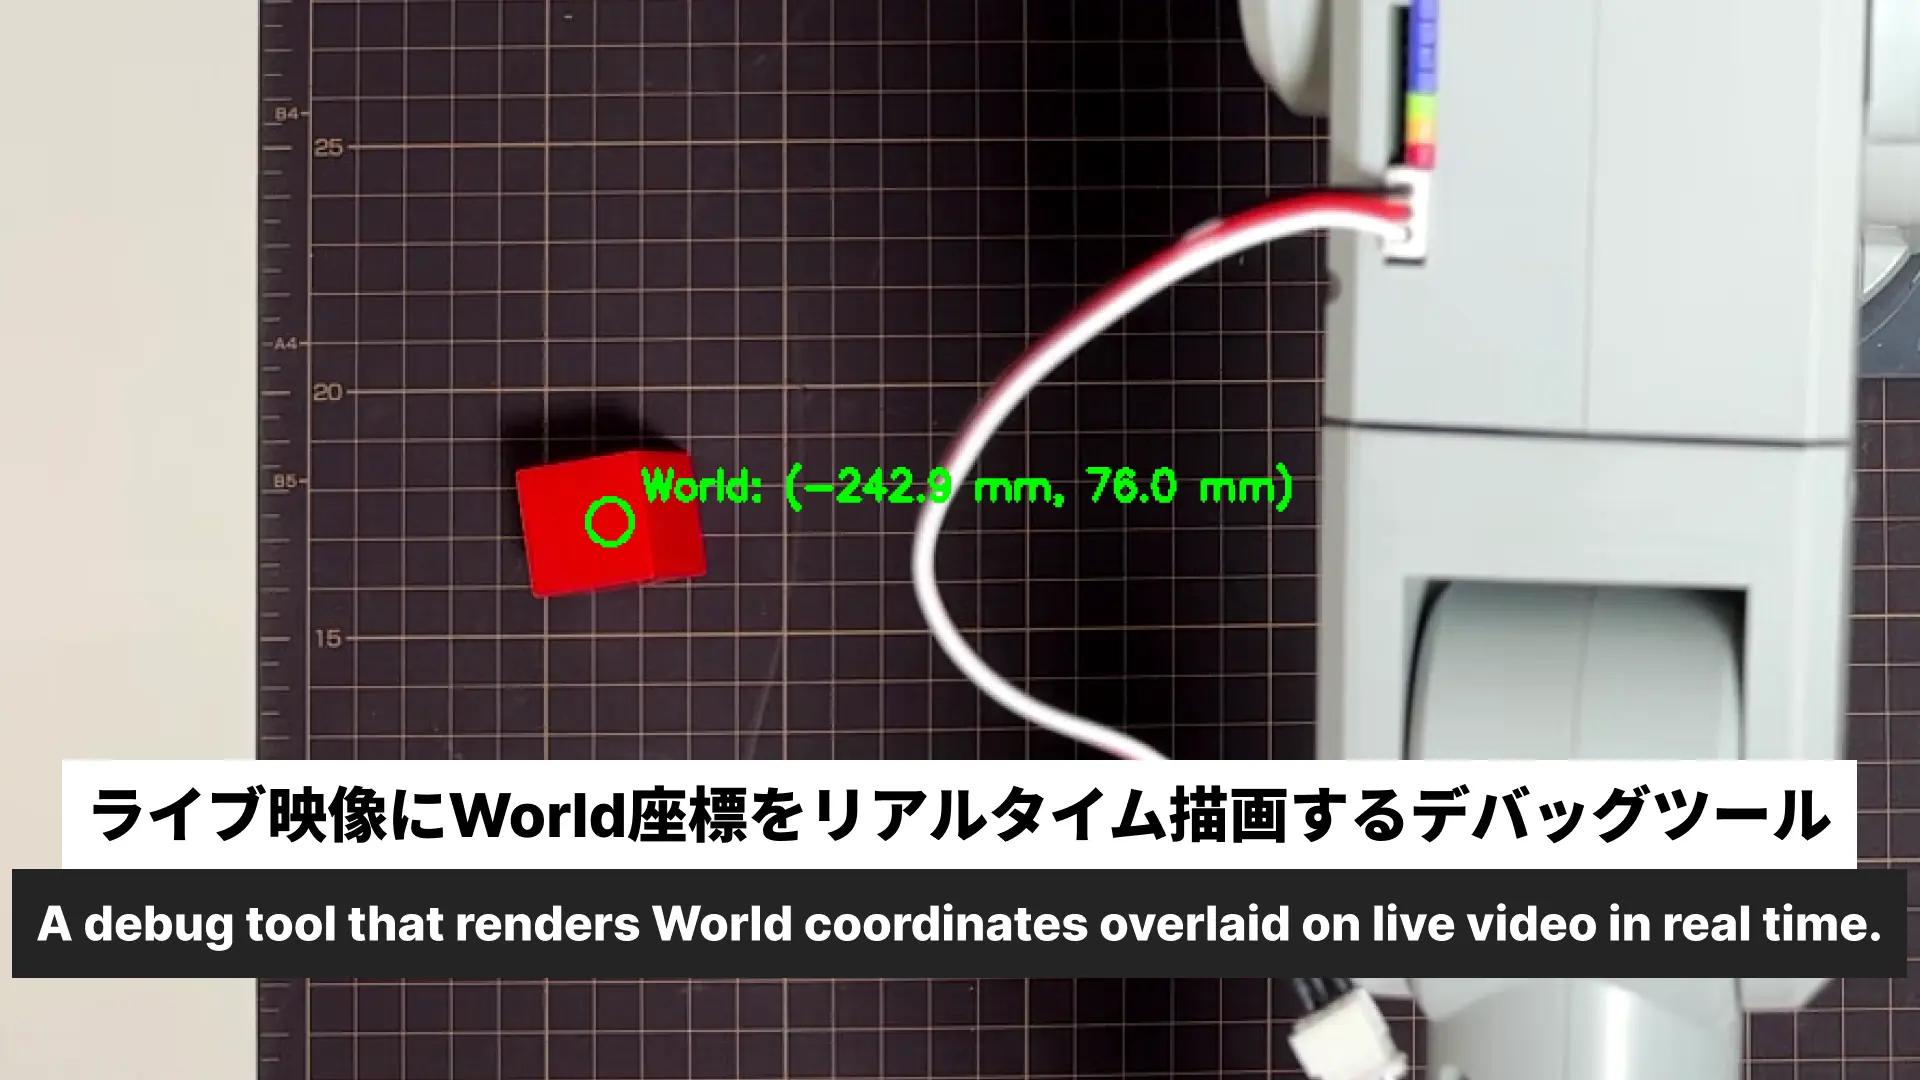
camera_preview.pyを実装した | ライブ映像にWorld座標がリアルタイム描画された | カメラ検出状況をその場で確認できるデバッグツールが完成した |
VLM評価の設計を固めた
— mechArmを動かす前に、評価部分だけ切り出して検証する。
LOG140でAGIBOTのGE-Sim 2.0を分析したときに見えた構造がある。
PIECE 01: 現実録画の標準化     → R2R2R ✅ あり(3Dスキャン+iPhone撮影)
PIECE 02: アクション条件付き実行 → R2R2R ✅ あり(Unityツイン+実機動作)
PIECE 03: 評価ループ           → R2R2R ❌ 欠けている(手動確認のみ)
評価部分を閉じることが今の最優先課題だった。
設計を決める前に出力形式を整理した。
True/False方式: シンプルで今すぐ使える。ただし後でCSVログに繋いだとき、「なぜ成功/失敗したか」の記録が残らない。使い物にならなくなる。
JSON方式:{"result": "success" or "failure", "reason": "判定理由を1文で"} 後でCSVログに繋ぎやすい。理由テキストが記録されることでログの意味が変わる。
JSON方式で確定した。
入力もIriun(OpenCV index 1)から自動取得する方式に確定。毎回手動で写真を撮る方式では自動化の意味がなくなる。
プロンプトの設計:
最初のプロンプトは「赤いブロックが指定エリア内に置かれているか」という曖昧な指示だった。実行すると「白い指定エリアの外側に置かれているため」という理由でfailureが返り、APIが「右側の箱」を指定エリアと自分で解釈していた。
プロンプトを明示した:
「この画像を見て、画像右側にある白い四角い容器(箱)の中に赤いブロックが
入っているかを判定してください。結果はJSONのみで返してください。
{"result": "success" or "failure", "reason": "判定理由を1文で"}」
vlm_judge.pyを実装した
— anthropic SDKをインストールし、フレーム取得→API送信→JSON解析を1スクリプトに。
pip3 install anthropic
pip3 show anthropic
# Name: anthropic / Version: 0.94.0
API KEYはplatform.claude.comで vlm_judge という名前で新規作成。~/.zshrcに設定した。
echo 'export ANTHROPIC_API_KEY="sk-ant-api03-..."' >> ~/.zshrc
source ~/.zshrc
実装したスクリプト(全文):
#!/usr/bin/env python3
"""
VLM判定スクリプト
Iriunカメラからフレームを取得し、
Anthropic APIを使用して赤ブロックの位置を判定するスクリプト。
"""

import cv2
import base64
import json
import sys
import os
import re
from anthropic import Anthropic


def capture_frame():
    cap = cv2.VideoCapture(1)
    if not cap.isOpened():
        print("カメラが見つかりません (index 1)")
        return None
    for _ in range(30):
        cap.read()
    ret, frame = cap.read()
    cap.release()
    if not ret:
        print("フレームの読み込みに失敗しました")
        return None
    return frame


def save_frame(frame, output_path):
    try:
        cv2.imwrite(output_path, frame)
        return True
    except Exception as e:
        print(f"エラー: フレームの保存に失敗しました。詳細: {e}")
        return False


def encode_image_to_base64(image_path):
    try:
        with open(image_path, "rb") as image_file:
            return base64.standard_b64encode(image_file.read()).decode("utf-8")
    except Exception as e:
        print(f"エラー: 画像のエンコードに失敗しました。詳細: {e}")
        return None


def judge_with_vlm(image_base64):
    try:
        client = Anthropic()
        message = client.messages.create(
            model="claude-sonnet-4-20250514",
            max_tokens=256,
            messages=[
                {
                    "role": "user",
                    "content": [
                        {
                            "type": "image",
                            "source": {
                                "type": "base64",
                                "media_type": "image/jpeg",
                                "data": image_base64,
                            },
                        },
                        {
                            "type": "text",
                            "text": "この画像を見て、画像右側にある白い四角い容器(箱)の中に赤いブロックが入っているかを判定してください。結果はJSONのみで返してください。{\"result\": \"success\" or \"failure\", \"reason\": \"判定理由を1文で\"}"
                        }
                    ],
                }
            ],
        )
        response_text = message.content[0].text
        match = re.search(r'\{.*?\}', response_text, re.DOTALL)
        if match:
            result_json = json.loads(match.group())
            return result_json
        else:
            print("エラー: APIレスポンスからJSONが見つかりません。")
            print(f"レスポンス: {response_text}")
            return None
    except json.JSONDecodeError:
        print("エラー: APIレスポンスのJSONパースに失敗しました。")
        return None
    except Exception as e:
        print(f"エラー: Anthropic APIの呼び出しに失敗しました。詳細: {e}")
        return None


def main():
    frame = capture_frame()
    if frame is None:
        sys.exit(1)
    output_path = os.path.expanduser("~/r2r2r-scripts/judge_frame.jpg")
    if not save_frame(frame, output_path):
        sys.exit(1)
    image_base64 = encode_image_to_base64(output_path)
    if image_base64 is None:
        sys.exit(1)
    result_json = judge_with_vlm(image_base64)
    if result_json is None:
        sys.exit(1)
    result = result_json.get("result", "unknown")
    reason = result_json.get("reason", "理由なし")
    print(f"result : {result}")
    print(f"reason : {reason}")
    print(f"画像保存先: {output_path}")


if __name__ == "__main__":
    main()
JSONパース設計の理由: re.search(r'\{.*?\}', response_text, re.DOTALL) でJSON部分だけ抽出してからパースしている。APIが稀にJSON前後に余分なテキストを付けることがあるため、直接json.loads(response_text)だとパースに失敗するケースがある。
3パターン+1で正確に判定した
— ブロックなし・外・中、全部正しく返ってきた。
実行コマンド:
cd ~/r2r2r-scripts && ANTHROPIC_API_KEY="sk-ant-api03-..." python3 vlm_judge.pyパターン1:ブロックなし
result : failure
reason : 画像内に赤いブロックが見当たらず、白いロボットアームと装置のみが確認できるため
パターン2:ブロックが箱の外(マット上)
result : failure
reason : 白い容器は空で、赤いブロックは容器の外の黒いマット上に置かれているため
パターン3:ブロックが箱の中
result : success
reason : 画像右側の白い四角い容器の中に赤いブロックが確認できます。
パターン4:容器を左側に移動してブロックを外に置いた場合
result : failure
reason : 画像右側の白い四角い容器は空で、赤いブロックは容器の外の台上に置かれているため
注目すべきはパターン4だ。プロンプトに「画像右側にある白い四角い容器」と位置を明示しているのに、容器を左側に移動させても正しくfailureを返した。VLMは位置の文字通りの解釈より「ブロックが容器の中にあるか」という意味を優先して判断している。
r2r2r_loop.pyにVLM判定を統合した
— HSV判定を完全にVLMで置き換えた。
import変更:
# 削除
import cv2
from camera_judge import detect_red

# 追加
from vlm_judge import capture_frame, save_frame, encode_image_to_base64, judge_with_vlm
カメラ初期化・ROIの削除:
# 削除
roi = (1571, 607, 249, 211)
cap = cv2.VideoCapture(1)
if not cap.isOpened():
    print("Error: Camera not found (index 1)")
    sys.exit(1)
判定ロジック変更:
# 変更前
is_detected, red_ratio = detect_red(cap, roi)
if red_ratio is None:
    continue
red_ratio_percent = red_ratio * 100

# 変更後
frame = capture_frame()
if frame is None:
    print(f"[Attempt {attempt}/3] Failed to read camera")
    continue

judge_frame_path = os.path.expanduser("~/r2r2r-scripts/judge_frame.jpg")
save_frame(frame, judge_frame_path)
image_base64 = encode_image_to_base64(judge_frame_path)
result_json = judge_with_vlm(image_base64)

is_detected = result_json is not None and result_json.get("result") == "success"
reason = result_json.get("reason", "判定失敗") if result_json else "判定失敗"
write_log関数のシグネチャ変更:
# 変更前
def write_log(trial_number, result, fail_step, red_ratio_percent):
    writer.writerow(["timestamp", "trial_number", "result", "fail_step", "red_ratio"])
    writer.writerow([timestamp, trial_number, result, fail_step, f"{red_ratio_percent:.1f}"])

# 変更後
def write_log(trial_number, result, fail_step, reason):
    writer.writerow(["timestamp", "trial_number", "result", "fail_step", "reason"])
    writer.writerow([timestamp, trial_number, result, fail_step, reason])
フルパイプライン実行結果:
=== R2R2R Loop Start ===
[Attempt 2/3] pick_and_place実行完了 ✓
[Attempt 2/3] Waiting 10s for completion...
[Attempt 2/3] Checking camera...
[Attempt 2/3] VLM: 画像右側の白い四角い容器の中に赤いブロックが明確に確認できます。 → OBJECT DETECTED ✓
  📝 ログ記録: trial=2 result=SUCCESS fail_step=None reason=画像右側の白い四角い容器の中に赤いブロックが明確に確認できます。
=== Loop Complete: SUCCESS ===
カメラ座標→ロボット座標の変換式を導出した
— ホモグラフィで得たWorld XYをsend_coords()に渡す変換式を設計した。
まず各姿勢のget_coords()を取得した:
# ホーム位置
# → [155.4, 0.9, 215.7, -95.79, 59.9, -94.66]

# APPROACH_PICK姿勢(関節角度: [-54.22, 81.91, -30.14, -8.08, -50.27, -29.44])
# → [134.9, -173.1, 49.9, -97.14, 55.44, -143.21]

# PICK姿勢(関節角度: [-46.93, 102.74, -43.33, 3.6, -60.11, -31.9])
# → [138.8, -167.5, 35.1, -96.25, 58.15, -143.63]
ブロックをPICK定位置に置いてdetect_block_position.pyを実行:
Pixel: (338, 859)
World: (-258.5 mm, 204.8 mm)
座標系の分析:
カメラ World XY:   X=-258.5mm,  Y=+204.8mm
ロボット PICK XY:  X=+138.8mm,  Y=-167.5mm

→ 両軸とも符号が逆
オフセット計算:
offset_x = robot_x - (-world_x) = 138.8 - 258.5 = -119.7
offset_y = robot_y - (-world_y) = -167.5 - (-204.8) = +37.3

変換式:
robot_x = -world_x + (-119.7)
robot_y = -world_y + 37.3
robot_z = 35.1  (PICK高さ固定)
検証:world=(-258.5, 204.8)を代入すると robot=(138.8, -167.5)で一致。
camera_pick_mac.py を実装した
— Mac側:カメラ検出→World座標→SSH経由でPi呼び出し。
#!/usr/bin/env python3
"""
Camera Pick Mac側スクリプト
カメラでブロックのWorld XYを取得し、
SSH経由でPiのスクリプトを呼び出す
"""

import sys
import os
import time
import cv2
import numpy as np
import paramiko
from detect_block_position import detect_red_block, pixel_to_world

SSH_HOST = "192.168.2.1"
SSH_USER = "ubuntu"
SSH_KEY_PATH = os.path.expanduser("~/.ssh/id_rsa_pi")
REMOTE_SCRIPT = "/home/ubuntu/camera_pick_pi.py"


def execute_ssh_command(host, user, key_path, command):
    try:
        client = paramiko.SSHClient()
        client.set_missing_host_key_policy(paramiko.AutoAddPolicy())
        client.connect(host, username=user, key_filename=key_path, timeout=10)
        stdin, stdout, stderr = client.exec_command(command)
        exit_code = stdout.channel.recv_exit_status()
        output = stdout.read().decode('utf-8', errors='ignore')
        error = stderr.read().decode('utf-8', errors='ignore')
        client.close()
        return (exit_code == 0), output, error
    except Exception as e:
        return False, "", str(e)


def transfer_file_scp(host, user, key_path, local_path, remote_path):
    try:
        client = paramiko.SSHClient()
        client.set_missing_host_key_policy(paramiko.AutoAddPolicy())
        client.connect(host, username=user, key_filename=key_path, timeout=10)
        sftp = client.open_sftp()
        sftp.put(local_path, remote_path)
        sftp.close()
        client.close()
        return True
    except Exception as e:
        print(f"  ✗ ファイル転送エラー: {e}")
        return False


def main():
    print("=== Camera Pick Start ===")
    print("[Mac] ブロック位置を検出中...")

    homography_path = os.path.expanduser("~/r2r2r-scripts/homography.npy")
    homography_matrix = np.load(homography_path)

    cap = cv2.VideoCapture(1)
    if not cap.isOpened():
        print("[Mac] ✗ カメラが見つかりません")
        sys.exit(1)

    for _ in range(30):
        cap.read()

    # 最大10回リトライしてブロックを検出
    centroid = None
    for i in range(10):
        ret, frame = cap.read()
        if not ret:
            continue
        centroid = detect_red_block(frame)
        if centroid is not None:
            break
        time.sleep(0.1)

    cap.release()

    if centroid is None:
        print("[Mac] ✗ ブロックが検出できませんでした(10回リトライ失敗)")
        sys.exit(1)

    pixel_x, pixel_y = centroid
    print(f"[Mac] ✓ ブロック検出: pixel_x={pixel_x}, pixel_y={pixel_y}")

    world_xy = pixel_to_world((pixel_x, pixel_y), homography_matrix)
    world_x, world_y = world_xy[0], world_xy[1]
    print(f"[Mac] ✓ World座標: world_x={world_x:.1f}mm, world_y={world_y:.1f}mm")

    # 検出フレームを表示(デバッグ用、2秒間)
    display_frame = frame.copy()
    cv2.circle(display_frame, (int(pixel_x), int(pixel_y)), 10, (0, 255, 0), 2)
    text = f"World: ({world_x:.1f} mm, {world_y:.1f} mm)"
    cv2.putText(display_frame, text, (int(pixel_x) + 15, int(pixel_y) - 10),
               cv2.FONT_HERSHEY_SIMPLEX, 0.6, (0, 255, 0), 2)
    cv2.imshow("Detected Block", display_frame)
    cv2.waitKey(2000)
    cv2.destroyAllWindows()

    print("[Mac] Pi側スクリプトを転送中...")
    local_script = os.path.join(os.path.dirname(__file__), "camera_pick_pi.py")
    if not transfer_file_scp(SSH_HOST, SSH_USER, SSH_KEY_PATH, local_script, REMOTE_SCRIPT):
        print("[Mac] ✗ ファイル転送失敗")
        sys.exit(1)

    print("[Mac] Pi側スクリプトを実行中...")
    command = f"python3 {REMOTE_SCRIPT} {world_x:.1f} {world_y:.1f}"
    success, output, error = execute_ssh_command(SSH_HOST, SSH_USER, SSH_KEY_PATH, command)

    if output:
        print(f"[Pi出力]:\n{output}")
    if error:
        print(f"[Piエラー]:\n{error}")

    if success:
        print("[Mac] ✓ Camera Pick完了")
    else:
        print("[Mac] ✗ Camera Pick失敗")
        sys.exit(1)


if __name__ == "__main__":
    main()
camera_pick_pi.py を実装した
— Pi側:World座標を引数で受け取り、変換してアーム制御。
#!/usr/bin/env python3
"""
Camera Pick Pi側スクリプト
World座標を受け取り、座標変換してアームをPICK位置に動かす
"""

import sys
import time
from pymycobot.mycobot import MyCobot

# 座標変換パラメータ
COORD_OFFSET_X = -119.7
COORD_OFFSET_Y = 37.3
ABOVE_Z = 120.0          # 真上の高さ(横スライド防止)
APPROACH_PICK_Z = 49.9   # APPROACH_PICK高さ
PICK_Z = 35.1            # PICK高さ

# PICK姿勢(APPROACH_PICKのget_coords()から取得)
PICK_RX = -97.14
PICK_RY = 55.44
PICK_RZ = -143.21

# 確定済み関節角度(send_angles用)
PICK_ANGLES = [-46.93, 102.74, -43.33, 3.6, -60.11, -31.9]
APPROACH_PICK_ANGLES = [-54.22, 81.91, -30.14, -8.08, -50.27, -29.44]

# send_coords()パラメータ
SPEED = 20
MODE = 0  # 線形補間


def main():
    if len(sys.argv) != 3:
        print("[Pi] ✗ 使用方法: python3 camera_pick_pi.py <world_x> <world_y>")
        sys.exit(1)

    try:
        world_x = float(sys.argv[1])
        world_y = float(sys.argv[2])
    except ValueError:
        print("[Pi] ✗ 座標は数値である必要があります")
        sys.exit(1)

    print(f"[Pi] World座標受け取り: world_x={world_x:.1f}mm, world_y={world_y:.1f}mm")

    robot_x = -world_x + COORD_OFFSET_X
    robot_y = -world_y + COORD_OFFSET_Y

    print(f"[Pi] ✓ ロボット座標に変換: robot_x={robot_x:.1f}mm, robot_y={robot_y:.1f}mm")

    print("[Pi] mechArm接続中...")
    try:
        mc = MyCobot('/dev/ttyAMA0', 1000000)
        time.sleep(3)
        print("[Pi] ✓ mechArm接続完了")
    except Exception as e:
        print(f"[Pi] ✗ mechArm接続失敗: {e}")
        sys.exit(1)

    try:
        # グリッパーを開く
        print("[Pi] グリッパーを開く...")
        mc.set_gripper_state(0, 100)
        time.sleep(1)

        # 真上に移動(横スライド防止)
        above_coords = [robot_x, robot_y, ABOVE_Z, PICK_RX, PICK_RY, PICK_RZ]
        print(f"[Pi] 真上に移動: {above_coords}")
        mc.send_coords(above_coords, SPEED, MODE)
        time.sleep(5)

        # APPROACH_PICK高さに移動
        approach_coords = [robot_x, robot_y, APPROACH_PICK_Z, PICK_RX, PICK_RY, PICK_RZ]
        print(f"[Pi] APPROACH_PICK高さに移動: {approach_coords}")
        mc.send_coords(approach_coords, SPEED, MODE)
        time.sleep(5)

        # PICK姿勢に移動(send_anglesで確定済み姿勢)← ここが設計の矛盾
        print(f"[Pi] PICK姿勢に移動: {PICK_ANGLES}")
        mc.send_angles(PICK_ANGLES, SPEED)
        time.sleep(8)

        # グリッパーを閉じる
        print("[Pi] グリッパーを閉じる...")
        mc.set_gripper_state(1, 70)
        time.sleep(2)

        # APPROACH_PICK姿勢に戻る
        print("[Pi] APPROACH_PICK姿勢に戻る...")
        mc.send_angles(APPROACH_PICK_ANGLES, SPEED)
        time.sleep(5)

        # ホームに戻る
        print("[Pi] ホームに戻る...")
        mc.send_angles([0, 0, 0, 0, 0, -30], 20)
        time.sleep(3)

        print("[Pi] ✓ Camera Pick完了")

    except Exception as e:
        print(f"[Pi] ✗ エラー: {e}")
        sys.exit(1)


if __name__ == "__main__":
    main()
camera_preview.pyを実装した
— ライブ映像にWorld座標をリアルタイム描画するデバッグツール。
#!/usr/bin/env python3
"""
Camera Preview スクリプト
iPhoneカメラのライブ映像を表示しながら、
赤ブロックの検出位置とWorld座標をリアルタイムで描画する
"""

import cv2
import numpy as np
import os
from detect_block_position import detect_red_block, pixel_to_world


def main():
    print("=== Camera Preview Start ===")

    homography_path = os.path.expanduser("~/r2r2r-scripts/homography.npy")
    try:
        homography_matrix = np.load(homography_path)
        print(f"✓ homography読み込み完了: {homography_path}")
    except Exception as e:
        print(f"✗ homography読み込み失敗: {e}")
        return

    cap = cv2.VideoCapture(1)
    if not cap.isOpened():
        print("✗ カメラが見つかりません (index 1)")
        return

    print("✓ カメラ初期化完了 / 'q'キーで終了")

    try:
        while True:
            ret, frame = cap.read()
            if not ret:
                break

            centroid = detect_red_block(frame)

            if centroid is not None:
                pixel_x, pixel_y = centroid
                world_xy = pixel_to_world((pixel_x, pixel_y), homography_matrix)
                world_x, world_y = world_xy[0], world_xy[1]

                cv2.circle(frame, (int(pixel_x), int(pixel_y)), 10, (0, 255, 0), 2)
                text = f"World: ({world_x:.1f} mm, {world_y:.1f} mm)"
                cv2.putText(frame, text, (int(pixel_x) + 15, int(pixel_y) - 10),
                           cv2.FONT_HERSHEY_SIMPLEX, 0.6, (0, 255, 0), 2)
            else:
                print("赤ブロックが検出されませんでした")

            cv2.imshow("Camera Preview", frame)

            key = cv2.waitKey(1) & 0xFF
            if key == ord('q'):
                break

    finally:
        cap.release()
        cv2.destroyAllWindows()


if __name__ == "__main__":
    main()
このツールで発見した事実:手がカメラに映り込むとHSVの赤検出が肌色に反応する。手を外せば正確に検出できた。
camera_pick_mac.pyで「赤ブロックが検出されませんでした」が頻発する問題もここで原因が判明した。30フレーム読み捨て後に1枚だけキャプチャする方式では、稀に検出できないフレームを掴む。最大10回リトライする方式に変更して解決した。
デバッグの記録
— send_coords()をめぐる試行錯誤の全記録。
問題1:send_coords()が空リストを返す
mc.send_coords([127.2, -42.6, 49.9, -96.25, 58.15, -143.63], 20, 0)
# → actual coords: []  ← 可動域外で動かなかった
原因:rx/ry/rzにPICK姿勢(エンドエフェクタが低い姿勢)の値 [-96.25, 58.15, -143.63] を指定したまま、Z=49.9という高い位置に動かそうとしたため可動域外になった。
APPROACH_PICKの姿勢パラメータ [-97.14, 55.44, -143.21] に変更することで解決:
mc.send_coords([143.4, -161.2, 120.0, -97.14, 55.44, -143.21], 20, 0)
# → coords: [143.3, -158.8, 111.1, -101.43, 55.61, -146.54]  ← 到達できた
問題2:横スライドでブロックを動かしてしまう
send_coords()のmode=0(線形補間)だとホームから直接横にスライドしてくる。Z=120mmの真上を経由するステップを追加した:
above_coords = [robot_x, robot_y, 120.0, PICK_RX, PICK_RY, PICK_RZ]
mc.send_coords(above_coords, SPEED, MODE)
time.sleep(5)
問題3:グリッパーが閉まらない
set_gripper_value(0, 70) を試した(0=完全閉じる方向)。単体テストでは動作確認できた:
mc.send_angles([-46.93, 102.74, -43.33, 3.6, -60.11, -31.9], 20)
time.sleep(5)
mc.set_gripper_value(0, 70)
# → gripper value: 45(ブロックが挟まっているので0にはならない。正常)しかしスクリプト内では機能しなかった。pick_and_place_fixed.pyで成功していた方式 set_gripper_state(1, 70) に戻して、PICKのtime.sleep()を8秒に延ばすことで解決した。
構造的な矛盾を発見した
— 追従した意味がなくなる設計に、終盤に気づいた。
camera_pick_pi.pyの現在の設計フロー:
send_coords([robot_x, robot_y, 120.0, ...])   ← カメラ追従
send_coords([robot_x, robot_y, 49.9, ...])    ← カメラ追従
send_angles([-46.93, 102.74, -43.33, 3.6, -60.11, -31.9], 20)  ← 固定座標に上書き
set_gripper_state(1, 70)send_angles(PICK_ANGLES)の時点で、カメラが検出したXY情報は完全に捨てられる。どの位置にブロックを置いても、PICKは常に元のキャリブレーション位置(X=138.8, Y=-167.5)に行く。
カメラ追従した意味がなくなっている。
次の設計方針:
# PICK動作もsend_coords()で統一する
send_coords([robot_x, robot_y, 120.0, rx, ry, rz])  # 真上(カメラ追従)
send_coords([robot_x, robot_y, 49.9,  rx, ry, rz])  # APPROACH(カメラ追従)
send_coords([robot_x, robot_y, 35.1,  rx, ry, rz])  # PICK(カメラ追従を維持)
set_gripper_state(1, 70)まずsend_coords([138.8, -167.5, 35.1, -97.14, 55.44, -143.21], 20, 0)がPICK定位置で安定して動くことを確認してから統合する。
確定した数値データ
# 各姿勢のget_coords()実測値
ホーム:         [155.4, 0.9, 215.7, -95.79, 59.9, -94.66]
APPROACH_PICK:  [134.9, -173.1, 49.9, -97.14, 55.44, -143.21]
PICK:           [138.8, -167.5, 35.1, -96.25, 58.15, -143.63]

# カメラ→ロボット変換式
robot_x = -world_x + (-119.7)
robot_y = -world_y + 37.3

# キャリブレーション基準点
world: (-258.5mm, 204.8mm) → robot: (138.8mm, -167.5mm)

# 複数位置での検証データ
world: (-253.5mm, 205.7mm) → robot: (133.8mm, -168.4mm)
world: (-242.9mm, 76.0mm)  → robot: (123.2mm, -38.7mm)
world: (-261.0mm, 153.3mm) → robot: (141.3mm, -116.0mm)
world: (-210.8mm, 158.0mm) → robot: (91.1mm,  -120.7mm)
world: (-258.6mm, 123.6mm) → robot: (138.9mm, -86.3mm)
スクリプト構成(LOG142終了時点)
~/r2r2r-scripts/(Mac側)
  vlm_judge.py              VLM判定(Claude API)✅ 完成
  r2r2r_loop.py             メインループ(VLM統合済み)✅ 完成
  camera_pick_mac.py        カメラ追従ピック・Mac側 ✅ 実装済み
  camera_pick_pi.py         カメラ追従ピック・Pi側 ⚠️ 設計修正が必要
  camera_preview.py         リアルタイムデバッグ表示 ✅ 完成
  detect_block_position.py  赤ブロックWorld座標取得
  calibrate_homography.py   キャリブレーション
  collect_block_positions.py データ収集
  homography.npy            キャリブレーション済み変換行列
  camera_judge.py           PLACE確認専用(固定ROI・変更禁止)
VLM評価はフルパイプラインで動いた。カメラ追従の骨格も動いた。でも「追従した意味がない」という設計の矛盾に気づいた。気づけてよかった。次はここを直す。